The Quest for the Growing Winter Greens
Every gardener dreams of stepping outside to harvest a basket of fresh, vibrant greens, especially when the main summer growing season is over.
But for many, the reality is a frustrating cycle of tough, bitter leaves, plants that bolt too soon, or plants that fail to thrive. We follow the common advice: we till, we amend, we plant when the calendar tells us to, and still end up with disappointing results.
What if the secret to a growing winter greens isn’t about working harder, but about working smarter?
What if the key lies in a few powerful strategies that go directly against traditional gardening wisdom? Success often hinges on challenging old habits and embracing a new approach.
Forget what you think you know about soil, timing, and fertilizer. Here are four secrets that will fundamentally change how you grow hardy greens and guarantee a successful, delicious harvest.
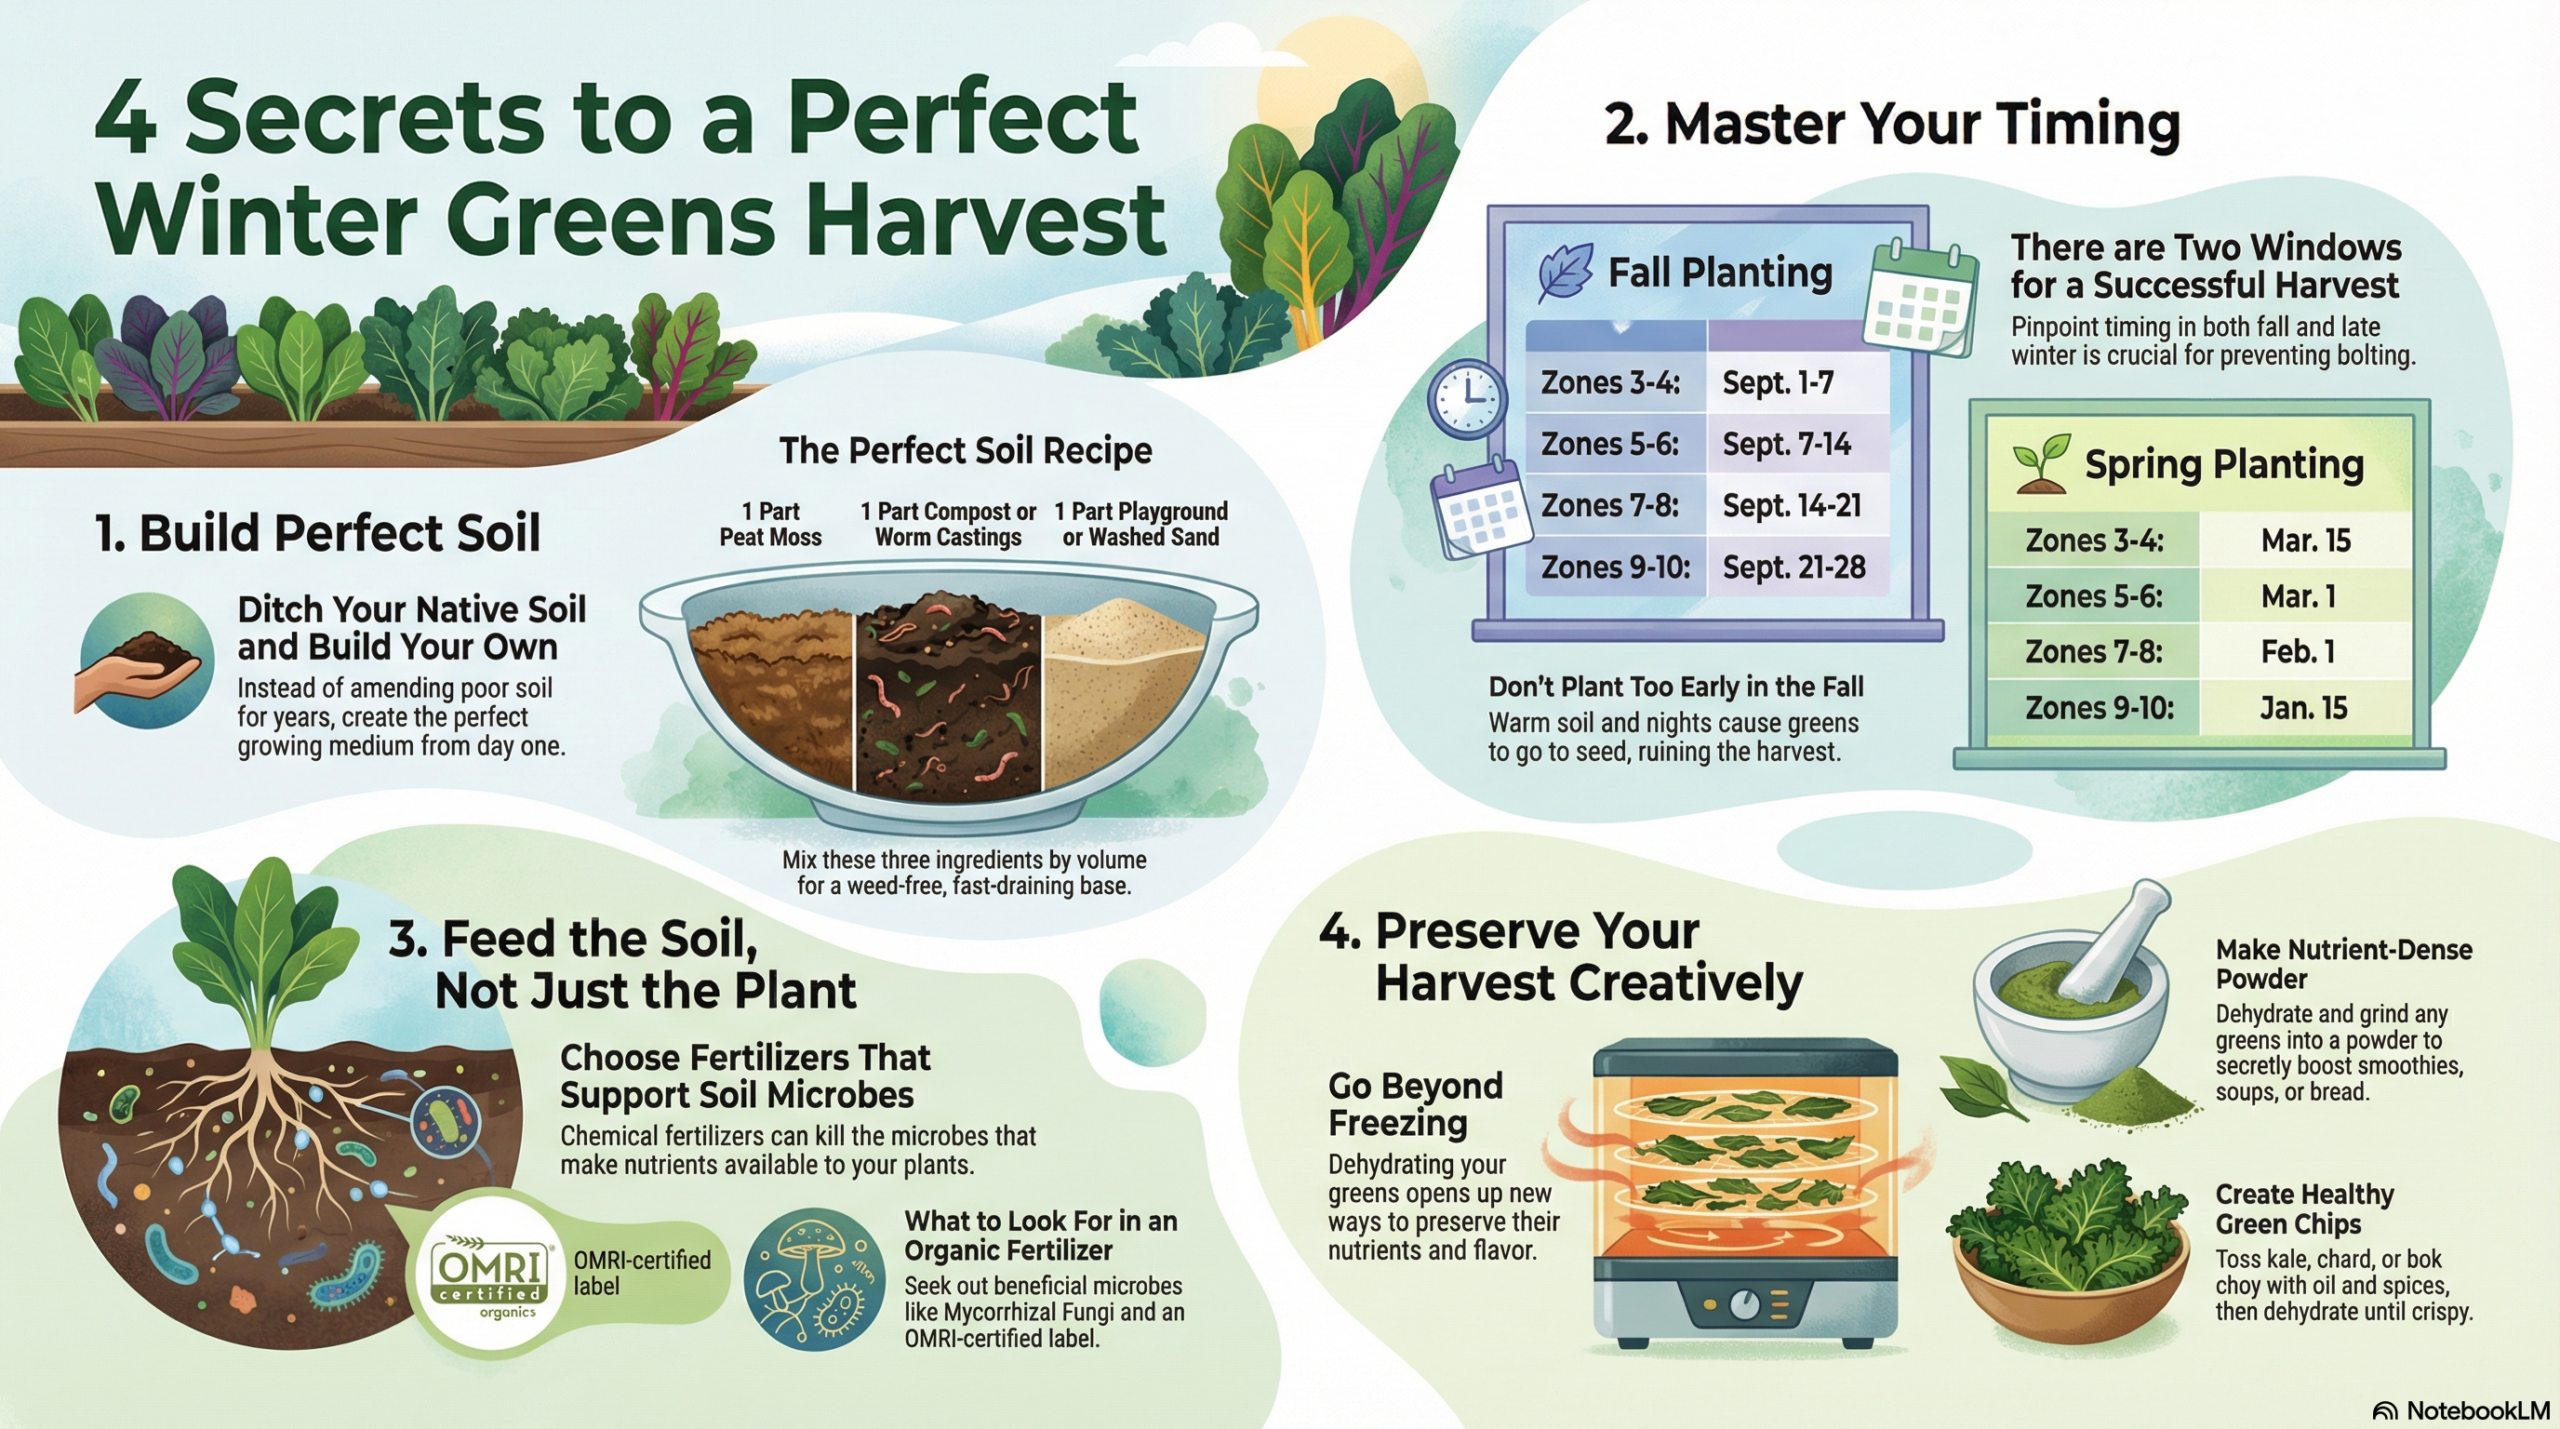
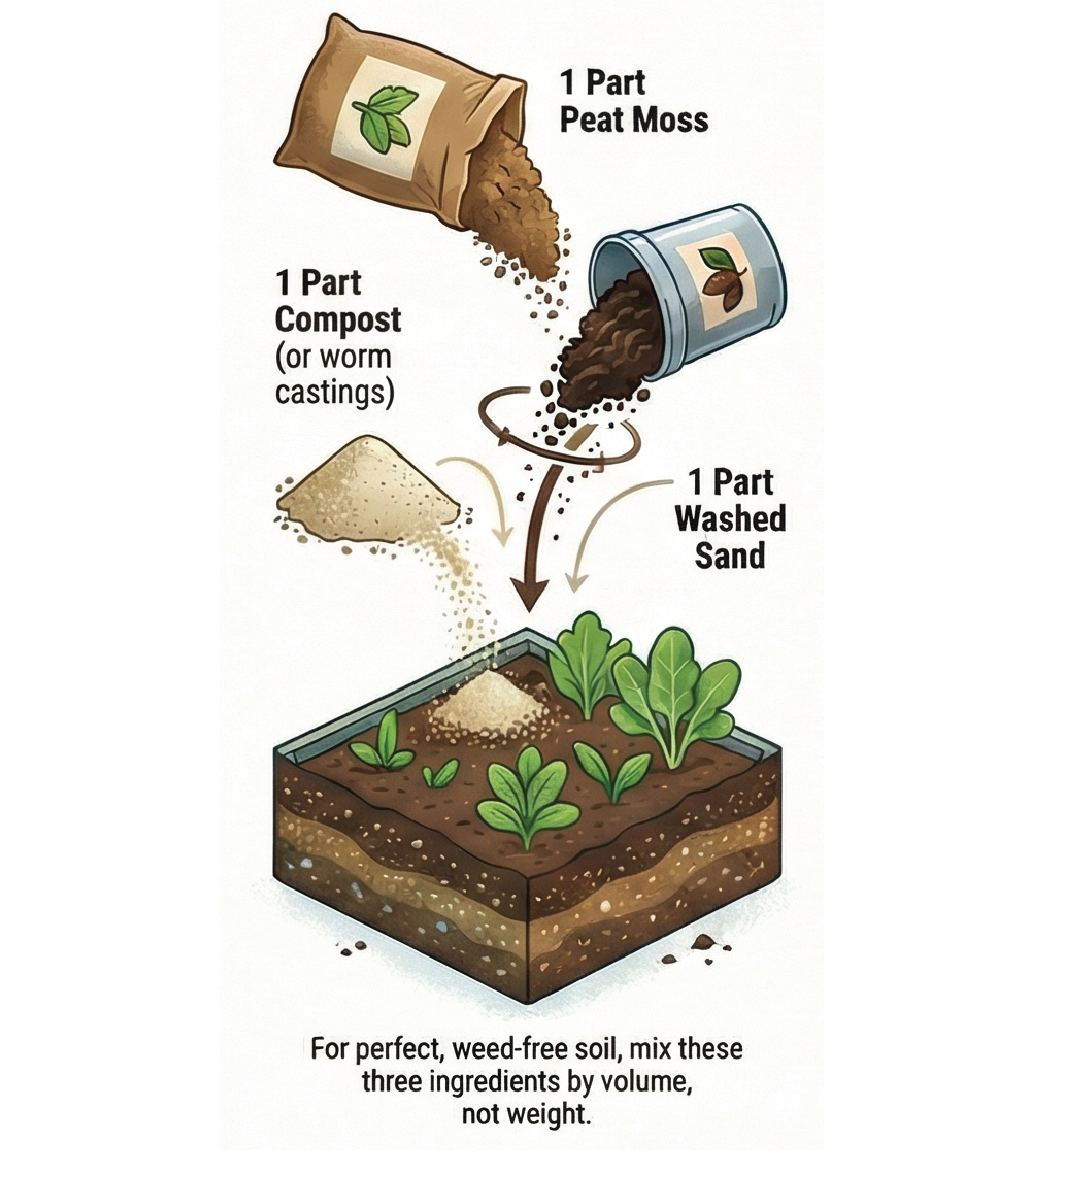
1. For Perfect Greens, You Have to Make Perfect Soil
Here’s the hard truth: for 99% of us, the soil in our gardens is not the sandy loam that vegetables crave. You can test it yourself. You can grab a handful of your soil; if it forms a hard ball, you have clay soil. If it won’t hold together at all, it’s too sandy. Vegetables will tolerate these conditions, but they will never reach their full potential.
The conventional wisdom is to spend years amending this poor soil with composts. The counterintuitive solution is to ditch it entirely. Instead of fighting your soil, build your own perfect soil from scratch in raised beds or containers.
The recipe is simple and creates the ideal environment for your greens to flourish.
Growing Winter Greens Soil Mix (Mix by volume, not weight)
• 1 part peat moss
• 1 part compost or worm castings
• 1 part playground or washed sand
When combining the ingredients, add water to ensure a consistent, lightly damp mix. For a small batch using 1-gallon buckets for each part, you would add about a half-gallon of water.
This approach offers four immediate and game-changing benefits:
• Perfect soil from day one. No waiting, no guessing.
• A virtually weed-free garden. You start with a clean slate, saving you hours of work.
• Excellent drainage. This is critical for preventing mold and fungus in cool-weather growing.
• Maximum plant potential. Your greens get exactly what they need to thrive.
Don’t be tempted to skip this step when growing winter greens. Building your own soil is the foundation for guaranteed success.
2. Timing Is Everything, and There Are Two Windows for Success
Getting your seeds in the ground at the right time is the first key to successfully growing winter greens. Winter greens have two primary planting windows: fall and spring. Success in both seasons depends on pinpoint timing.
The Fall Planting Window
For a fall and winter harvest, the most common and costly mistake is planting too early. When the soil and nights are still too warm, your greens are likely to bolt, meaning they go to seed prematurely, ruining your harvest before it even begins.
Plant too late, however, and your seedlings won’t get established before the cold and short days of winter arrive.
The perfect planting window depends entirely on your growing zone:
• Zones 3-4: Plant the first week of September (Sept. 1-7).
• Zones 5-6: Plant the second week of September (Sept. 7-14).
• Zones 7-8: Plant the third week of September (Sept. 14-21).
• Zones 9-10: Plant the last week of September (Sept. 21-28), or wait until the first week of October if you’re still experiencing summer heat.
Pay special attention to spinach, which is particularly sensitive to heat. It struggles when night temperatures remain over 55°F, so you may need to plant it a week or two after your other greens in warmer climates.
The Spring Planting Window
You can get a second, incredible harvest by planting another round of greens in late winter or early spring. The greens that survived the winter will be tired and ready to bolt as the days get longer. Starting fresh with new seeds gives you a crop of vigorous young plants for a spectacular spring harvest.
Here are the ideal spring planting times by zone:
• Zones 9-10: Plant by January 15.
• Zones 7-8: Plant around February 1.
• Zones 5-6: Plant around March 1.
• Zones 3-4: Plant around March 15.
3. Your Fertilizer Isn’t Just for Plants. It’s for Microbes, too!
When choosing a fertilizer, it’s crucial to think beyond feeding the plant and focus on feeding the soil. Chemical fertilizers can kill the essential soil microbes that make nutrients available to your plants. Always choose an organic fertilizer to protect and nourish this vital soil life.
Plants require 17 essential nutrients to thrive.
A high-performing organic fertilizer should contain these five critical components:
1. Balanced Macronutrients: Look for a fertilizer with a lower first number (Nitrogen), such as a 4-9-3 or 2-4-3 ratio. Too much nitrogen can cause fruiting plants like tomatoes to produce lush leaves at the expense of fruit.
2. Calcium: Often considered the fourth macronutrient, calcium is essential for building strong plant cell walls.
3. Micronutrients: Also known as trace minerals, these are vital for plant health. Kelp meal is an excellent source of nutrients.
4. Soil Microbes: A truly great fertilizer will include beneficial microbes. Look for mycorrhizal fungi, which form a special bond with plant roots, helping them absorb more water and nutrients.
5. Organic Ingredients: To ensure a product is truly organic and safe for your soil’s ecosystem, look for the OMRI (Organic Materials Review Institute) label on the package. If it has this label, it won’t harm the microbes that feed your plants.
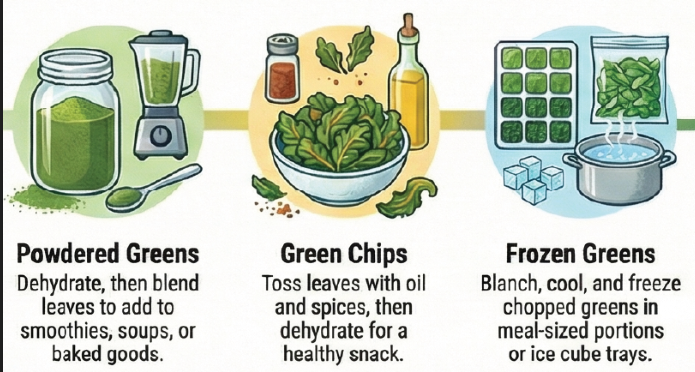
4. Turn Your Greens into Chips or Nutrient-Boosting Powder
Growing winter greens isn’t about stuffing yourself with greens at every meal. Preserving your harvest is a great options and it doesn’t have to end with a freezer full of green blocks.
While freezing is a fantastic option, especially for saving spring spinach to use in summer when it’s too hot to grow, dehydrating opens up a world of creative and practical possibilities.
Powdered Greens (My Favorite)
This technique works for all greens, even lettuce and broccoli leaves. The process is simple: wash, chop, and dehydrate the leaves until they are completely crisp. Then, grind them into a fine powder using a blender or spice grinder. This nutrient-dense powder can be secretly added to almost anything, from smoothies, soups, stews, bread, and even cookies or cakes, for a hidden boost of vitamins.
Green Chips
This is a fun and delicious snack you can make with a variety of greens. Thicker leaves from plants like Swiss chard, kale, bok choy, Tokyo Bekana, and Shungiku (edible chrysanthemum) work wonderfully. Toss bite-sized leaves with a very light coating of oil and your favorite spices, then dehydrate them until crispy.
Want more practical gardening, herbal, and self-sufficiency guides like this? Join the Organic Heir newsletter.
A New Approach to Your Garden
Growing winter greens and achieving a truly thriving garden full of these hardy leafs isn’t about luck; it’s about strategy. By challenging old habits and embracing a new approach to building soil, perfecting your timing, feeding the entire soil ecosystem, and creatively preserving your harvest, you can unlock your garden’s true potential.
Now that you know the secrets, what’s the first thing you’ll try differently in your garden this season?